OpenVINO™ ツールキットは、インテルが無償で提供しているインテル製の CPU や GPU、VPU、FPGA
などのパフォーマンスを最大限に活用して、コンピューター・ビジョン、画像関係をはじめ、自然言語処理や音声処理など、幅広いディープラーニング・モデルで推論を最適化し高速化する推論エンジン
/ ツールスイートです。[2] (Intel公式より)
OpenVINO™ ツールキットは、シンプルなコード記述で動作するため、AI の導入や保守を簡素化することができます。インテルの CPU や
GPU、VPU、FPGA などの各種デバイスで共通したコードを使用でき、優れた推論エンジンにより AI
アプリケーションのパフォーマンスをそれぞれのデバイスに最適化して展開可能です。最適化された事前学習済みモデルを提供する Open Model Zoo
(OMZ) や TensorFlow、PyTorch、Caffe* などの一般的なフレームワークを使用してトレーニングしたモデルを変換し、最適化する
Model Optimizer を使用できます。[2] (Intel公式より)
#!/usr/bin/env python3
"""
This source code is based on and modified from human_pose_estimation_demo.py in Intel's open_model_zoo demo.
The image input part is changed to a network camera, so please refer to the original to check the changes.
このソースコードは、Intelのopen_model_zooデモのhuman_pose_estimation_demo.pyを元に、改変したものです。
画像入力部分をネットワークカメラに変更していますので、変更点の確認はオリジナルを参照してください。
"""
import logging as log
import sys
from argparse import ArgumentParser, SUPPRESS
from pathlib import Path
from time import perf_counter
import cv2
import numpy as np
import requests
from requests.auth import HTTPDigestAuth
sys.path.append(str(Path(__file__).resolve().parents[2] / 'common/python'))
sys.path.append(str(Path(__file__).resolve().parents[2] / 'common/python/openvino/model_zoo'))
from model_api.models import ImageModel, OutputTransform
from model_api.performance_metrics import PerformanceMetrics
from model_api.pipelines import get_user_config, AsyncPipeline
from model_api.adapters import create_core, OpenvinoAdapter
import monitors
from images_capture import open_images_capture
from helpers import resolution, log_latency_per_stage
log.basicConfig(format='[ %(levelname)s ] %(message)s', level=log.DEBUG, stream=sys.stdout)
ARCHITECTURES = {
'ae': 'HPE-assosiative-embedding',
'higherhrnet': 'HPE-assosiative-embedding',
'openpose': 'openpose'
}
def build_argparser():
parser = ArgumentParser(add_help=False)
args = parser.add_argument_group('Options')
args.add_argument('-h', '--help', action='help', default=SUPPRESS, help='Show this help message and exit.')
args.add_argument('-m', '--model', help='Required. Path to an .xml file with a trained model.',
required=True, type=Path)
args.add_argument('-at', '--architecture_type', help='Required. Specify model\' architecture type.',
type=str, required=True, choices=('ae', 'higherhrnet', 'openpose'))
#args.add_argument('-i', '--input', required=True,
# help='Required. An input to process. The input must be a single image, '
# 'a folder of images, video file or camera id.')
args.add_argument('--loop', default=False, action='store_true',
help='Optional. Enable reading the input in a loop.')
#args.add_argument('-o', '--output', required=False,
# help='Optional. Name of the output file(s) to save.')
args.add_argument('-limit', '--output_limit', required=False, default=1000, type=int,
help='Optional. Number of frames to store in output. '
'If 0 is set, all frames are stored.')
args.add_argument('-d', '--device', default='CPU', type=str,
help='Optional. Specify the target device to infer on; CPU, GPU, HDDL or MYRIAD is '
'acceptable. The demo will look for a suitable plugin for device specified. '
'Default value is CPU.')
common_model_args = parser.add_argument_group('Common model options')
common_model_args.add_argument('-t', '--prob_threshold', default=0.1, type=float,
help='Optional. Probability threshold for poses filtering.')
common_model_args.add_argument('--tsize', default=None, type=int,
help='Optional. Target input size. This demo implements image pre-processing '
'pipeline that is common to human pose estimation approaches. Image is first '
'resized to some target size and then the network is reshaped to fit the input '
'image shape. By default target image size is determined based on the input '
'shape from IR. Alternatively it can be manually set via this parameter. Note '
'that for OpenPose-like nets image is resized to a predefined height, which is '
'the target size in this case. For Associative Embedding-like nets target size '
'is the length of a short first image side.')
common_model_args.add_argument('--layout', type=str, default=None,
help='Optional. Model inputs layouts. '
'Ex. NCHW or input0:NCHW,input1:NC in case of more than one input.')
infer_args = parser.add_argument_group('Inference options')
infer_args.add_argument('-nireq', '--num_infer_requests', help='Optional. Number of infer requests',
default=0, type=int)
infer_args.add_argument('-nstreams', '--num_streams',
help='Optional. Number of streams to use for inference on the CPU or/and GPU in throughput '
'mode (for HETERO and MULTI device cases use format '
'<device1>:<nstreams1>,<device2>:<nstreams2> or just <nstreams>).',
default='', type=str)
infer_args.add_argument('-nthreads', '--num_threads', default=None, type=int,
help='Optional. Number of threads to use for inference on CPU (including HETERO cases).')
io_args = parser.add_argument_group('Input/output options')
io_args.add_argument('-no_show', '--no_show', help="Optional. Don't show output.", action='store_true')
io_args.add_argument('--output_resolution', default=None, type=resolution,
help='Optional. Specify the maximum output window resolution '
'in (width x height) format. Example: 1280x720. '
'Input frame size used by default.')
io_args.add_argument('-u', '--utilization_monitors', default='', type=str,
help='Optional. List of monitors to show initially.')
debug_args = parser.add_argument_group('Debug options')
debug_args.add_argument('-r', '--raw_output_message', help='Optional. Output inference results raw values showing.',
default=False, action='store_true')
return parser
default_skeleton = ((15, 13), (13, 11), (16, 14), (14, 12), (11, 12), (5, 11), (6, 12), (5, 6),
(5, 7), (6, 8), (7, 9), (8, 10), (1, 2), (0, 1), (0, 2), (1, 3), (2, 4), (3, 5), (4, 6))
colors = (
(255, 0, 0), (255, 0, 255), (170, 0, 255), (255, 0, 85),
(255, 0, 170), (85, 255, 0), (255, 170, 0), (0, 255, 0),
(255, 255, 0), (0, 255, 85), (170, 255, 0), (0, 85, 255),
(0, 255, 170), (0, 0, 255), (0, 255, 255), (85, 0, 255),
(0, 170, 255))
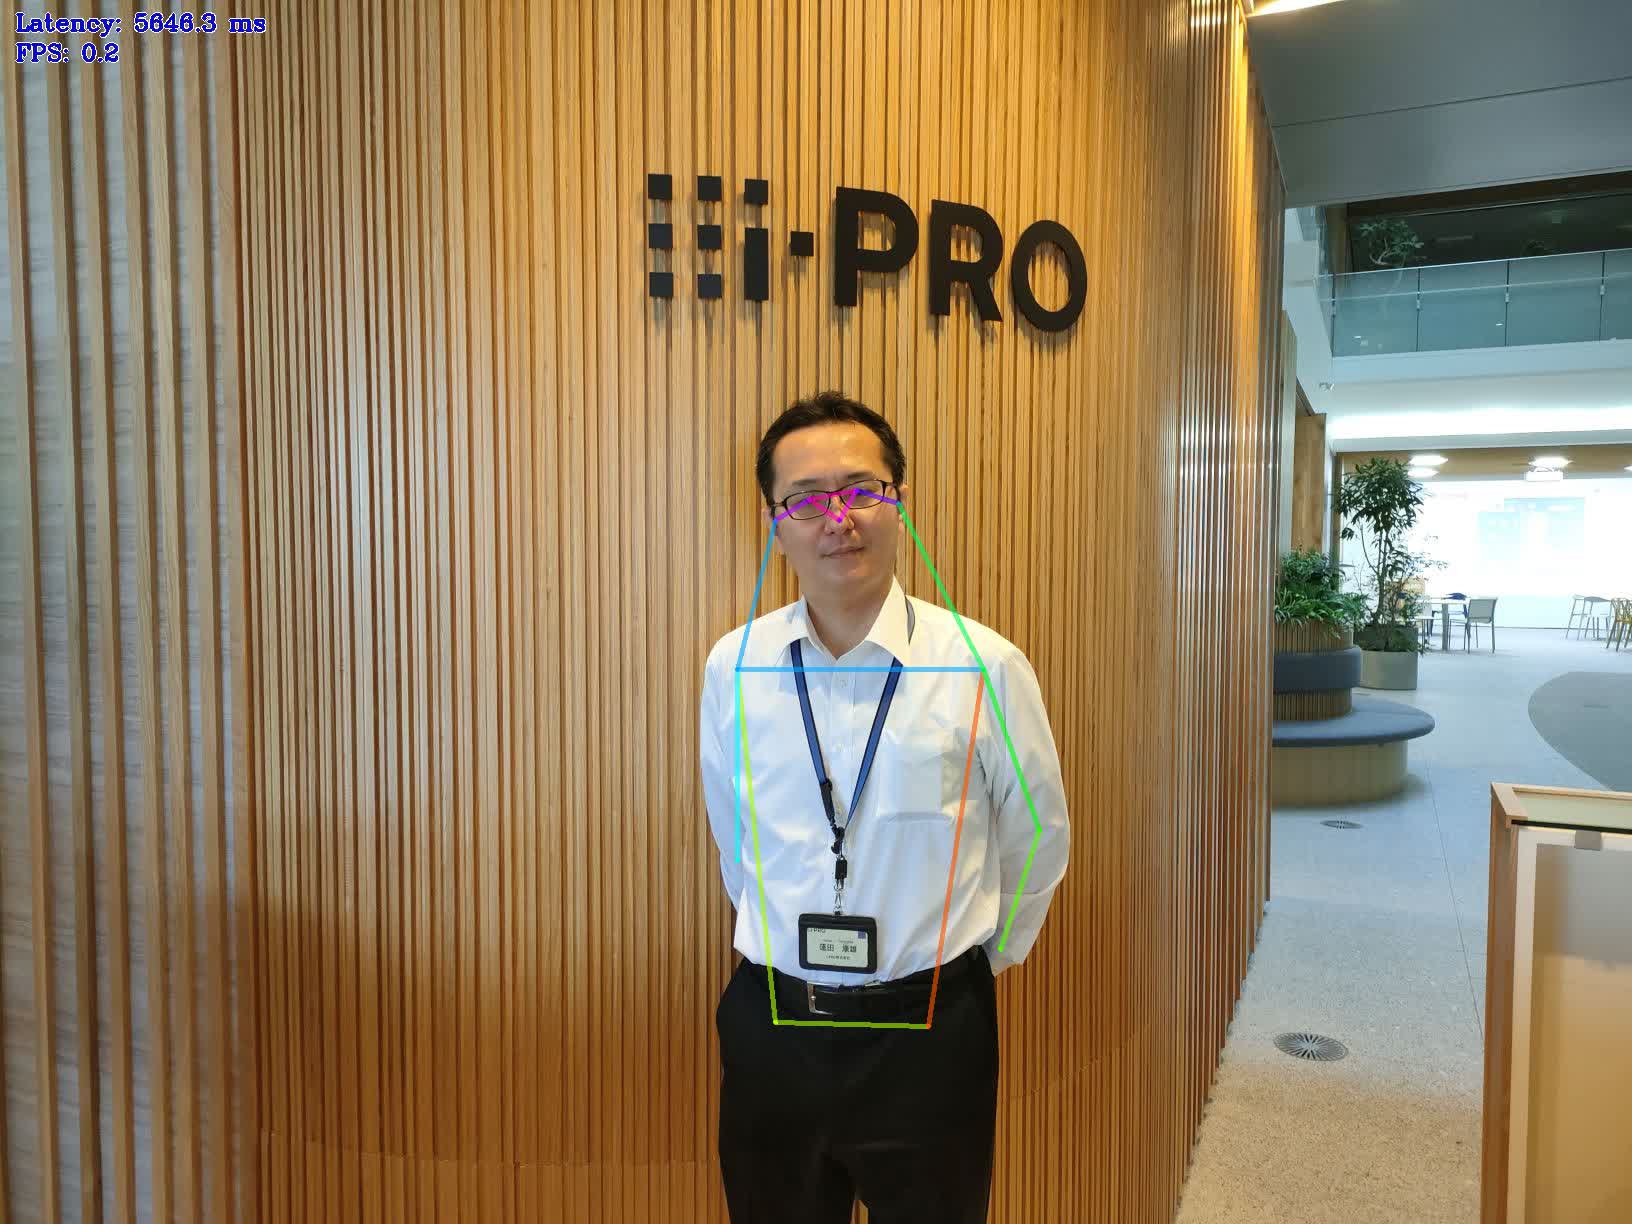
def draw_poses(img, poses, point_score_threshold, output_transform, skeleton=default_skeleton, draw_ellipses=False):
img = output_transform.resize(img)
if poses.size == 0:
return img
stick_width = 4
img_limbs = np.copy(img)
for pose in poses:
points = pose[:, :2].astype(np.int32)
points = output_transform.scale(points)
points_scores = pose[:, 2]
# Draw joints.
for i, (p, v) in enumerate(zip(points, points_scores)):
if v > point_score_threshold:
cv2.circle(img, tuple(p), 1, colors[i], 2)
# Draw limbs.
for i, j in skeleton:
if points_scores[i] > point_score_threshold and points_scores[j] > point_score_threshold:
if draw_ellipses:
middle = (points[i] + points[j]) // 2
vec = points[i] - points[j]
length = np.sqrt((vec * vec).sum())
angle = int(np.arctan2(vec[1], vec[0]) * 180 / np.pi)
polygon = cv2.ellipse2Poly(tuple(middle), (int(length / 2), min(int(length / 50), stick_width)),
angle, 0, 360, 1)
cv2.fillConvexPoly(img_limbs, polygon, colors[j])
else:
cv2.line(img_limbs, tuple(points[i]), tuple(points[j]), color=colors[j], thickness=stick_width)
cv2.addWeighted(img, 0.4, img_limbs, 0.6, 0, dst=img)
return img
def print_raw_results(poses, scores, frame_id):
log.debug(' ------------------- Frame # {} ------------------ '.format(frame_id))
for pose, pose_score in zip(poses, scores):
pose_str = ' '.join('({:.2f}, {:.2f}, {:.2f})'.format(p[0], p[1], p[2]) for p in pose)
log.debug('{} | {:.2f}'.format(pose_str, pose_score))
def main():
args = build_argparser().parse_args()
#cap = open_images_capture(args.input, args.loop)
next_frame_id = 1
next_frame_id_to_show = 0
metrics = PerformanceMetrics()
render_metrics = PerformanceMetrics()
video_writer = cv2.VideoWriter()
plugin_config = get_user_config(args.device, args.num_streams, args.num_threads)
model_adapter = OpenvinoAdapter(create_core(), args.model, device=args.device, plugin_config=plugin_config,
max_num_requests=args.num_infer_requests, model_parameters = {'input_layouts': args.layout})
start_time = perf_counter()
user_id = "user-id" # Change to match your camera setting
user_pw = "password" # Change to match your camera setting
host = "192.168.0.10" # Change to match your camera setting
url = f"http://{host}/cgi-bin/camera?"
# Request and receive image from camera.
rs = requests.get(url, auth=HTTPDigestAuth(user_id, user_pw))
# Convert from binary to ndarray.
img_buf= np.frombuffer(rs.content, dtype=np.uint8)
# Convert from ndarray to OpenCV image.
frame = cv2.imdecode(img_buf, cv2.IMREAD_UNCHANGED)
#frame = cap.read()
if frame is None:
raise RuntimeError("Can't read an image from the input")
config = {
'target_size': args.tsize,
'aspect_ratio': frame.shape[1] / frame.shape[0],
'confidence_threshold': args.prob_threshold,
'padding_mode': 'center' if args.architecture_type == 'higherhrnet' else None, # the 'higherhrnet' and 'ae' specific
'delta': 0.5 if args.architecture_type == 'higherhrnet' else None, # the 'higherhrnet' and 'ae' specific
}
model = ImageModel.create_model(ARCHITECTURES[args.architecture_type], model_adapter, config)
model.log_layers_info()
hpe_pipeline = AsyncPipeline(model)
hpe_pipeline.submit_data(frame, 0, {'frame': frame, 'start_time': start_time})
output_transform = OutputTransform(frame.shape[:2], args.output_resolution)
if args.output_resolution:
output_resolution = output_transform.new_resolution
else:
output_resolution = (frame.shape[1], frame.shape[0])
presenter = monitors.Presenter(args.utilization_monitors, 55,
(round(output_resolution[0] / 4), round(output_resolution[1] / 8)))
#if args.output and not video_writer.open(args.output, cv2.VideoWriter_fourcc(*'MJPG'), cap.fps(),
# output_resolution):
# raise RuntimeError("Can't open video writer")
while True:
if hpe_pipeline.callback_exceptions:
raise hpe_pipeline.callback_exceptions[0]
# Process all completed requests
results = hpe_pipeline.get_result(next_frame_id_to_show)
# Request and receive image from camera.
rs = requests.get(url, auth=HTTPDigestAuth(user_id, user_pw))
# Convert from binary to ndarray.
img_buf= np.frombuffer(rs.content, dtype=np.uint8)
# Convert from ndarray to OpenCV image.
frame = cv2.imdecode(img_buf, cv2.IMREAD_UNCHANGED)
if results:
(poses, scores), frame_meta = results
frame = frame_meta['frame']
start_time = frame_meta['start_time']
if len(poses) and args.raw_output_message:
print_raw_results(poses, scores, next_frame_id_to_show)
presenter.drawGraphs(frame)
rendering_start_time = perf_counter()
frame = draw_poses(frame, poses, args.prob_threshold, output_transform)
render_metrics.update(rendering_start_time)
metrics.update(start_time, frame)
if video_writer.isOpened() and (args.output_limit <= 0 or next_frame_id_to_show <= args.output_limit-1):
video_writer.write(frame)
next_frame_id_to_show += 1
if not args.no_show:
cv2.imshow('Pose estimation results', frame)
key = cv2.waitKey(1)
ESC_KEY = 27
# Quit.
if key in {ord('q'), ord('Q'), ESC_KEY}:
break
presenter.handleKey(key)
continue
if hpe_pipeline.is_ready():
# Get new image/frame
start_time = perf_counter()
#frame = cap.read()
if frame is None:
break
# Submit for inference
hpe_pipeline.submit_data(frame, next_frame_id, {'frame': frame, 'start_time': start_time})
next_frame_id += 1
else:
# Wait for empty request
hpe_pipeline.await_any()
hpe_pipeline.await_all()
if hpe_pipeline.callback_exceptions:
raise hpe_pipeline.callback_exceptions[0]
# Process completed requests
for next_frame_id_to_show in range(next_frame_id_to_show, next_frame_id):
results = hpe_pipeline.get_result(next_frame_id_to_show)
(poses, scores), frame_meta = results
frame = frame_meta['frame']
start_time = frame_meta['start_time']
if len(poses) and args.raw_output_message:
print_raw_results(poses, scores, next_frame_id_to_show)
presenter.drawGraphs(frame)
rendering_start_time = perf_counter()
frame = draw_poses(frame, poses, args.prob_threshold, output_transform)
render_metrics.update(rendering_start_time)
metrics.update(start_time, frame)
if video_writer.isOpened() and (args.output_limit <= 0 or next_frame_id_to_show <= args.output_limit-1):
video_writer.write(frame)
if not args.no_show:
frame = cv2.resize(frame, None, None, 0.5, 0.5)
cv2.imshow('Pose estimation results', frame)
key = cv2.waitKey(1)
ESC_KEY = 27
# Quit.
if key in {ord('q'), ord('Q'), ESC_KEY}:
break
presenter.handleKey(key)
metrics.log_total()
#log_latency_per_stage(cap.reader_metrics.get_latency(),
# hpe_pipeline.preprocess_metrics.get_latency(),
# hpe_pipeline.inference_metrics.get_latency(),
# hpe_pipeline.postprocess_metrics.get_latency(),
# render_metrics.get_latency())
for rep in presenter.reportMeans():
log.info(rep)
if __name__ == '__main__':
sys.exit(main() or 0)
Licensed under the Apache License, Version 2.0 (the "License");
you may not use this file except in compliance with the License.
You may obtain a copy of the License at
Unless required by
applicable law or agreed to in writing, software distributed under the
License is distributed on an "AS IS" BASIS, WITHOUT WARRANTIES OR
CONDITIONS OF ANY KIND, either express or implied. See the License for the
specific language governing permissions and limitations under the License.
Licensed under the Apache License, Version
2.0 (the "License"); you may not use this file except in compliance with
the License. You may obtain a copy of the License at
Unless required by
applicable law or agreed to in writing, software distributed under the
License is distributed on an "AS IS" BASIS, WITHOUT WARRANTIES OR
CONDITIONS OF ANY KIND, either express or implied. See the License for
the specific language governing permissions and limitations under the
License.