[概要]
前章で記載の通り、カメラブラウザの画面上で WV-XAE200WUX の認識結果を閲覧することができます。
しかし、i-PRO カメラから映像を受け取りPC上で映像を表示する独自のプログラムをあなたが単純に作成するだけでは、
カメラブラウザのように WV-XAE200WUX の認識結果の表示を行うことはできません。
i-PRO カメラから認識結果を受け取って認識結果を描画するプログラムを作成する必要があります。これを実現する方法について、以下で順番に説明を行っていきます。
本章では、まずは認識結果を受け取って取り出すまでについて説明します。
資料[1][4] によると JPEG, RTSP ともにパケットに AI 認識結果を記録しているようです。
私の技量では RTSP からこの情報を取り出すのは難があるので、JPEG から情報を取り出す方針とします。
JPEG
ヘッダのコメント領域に記録されているということなので、JPEG ヘッダを分析して情報を取り出してみます。
いきなりカメラと接続してチャレンジするのは大変なので、まずは静止画(JPEG)ファイルを取得し、これをバイナリエディタなどで実際のデータ構造を確認しながら方針や実現方法などを検討していきたいと思います。
[評価環境]
|
| 言語 : |
Python, |
3.10.4 |
|
| OS : |
Windows 11 home, |
21H2 |
| |
Windows 10 Pro, |
21H1 |
|
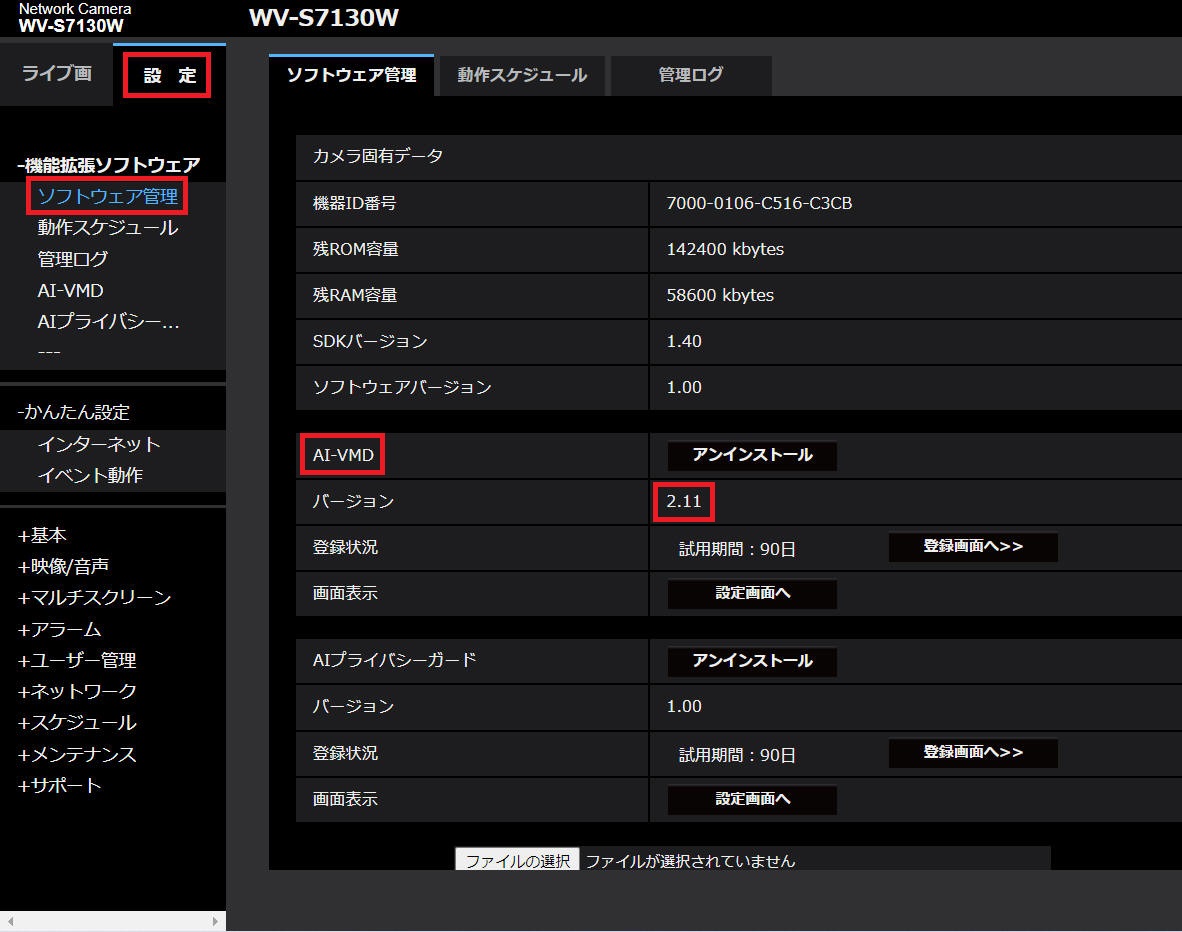
| 機能拡張ソフトウェア : |
WV-XAE200WUX, |
2.20 |
|
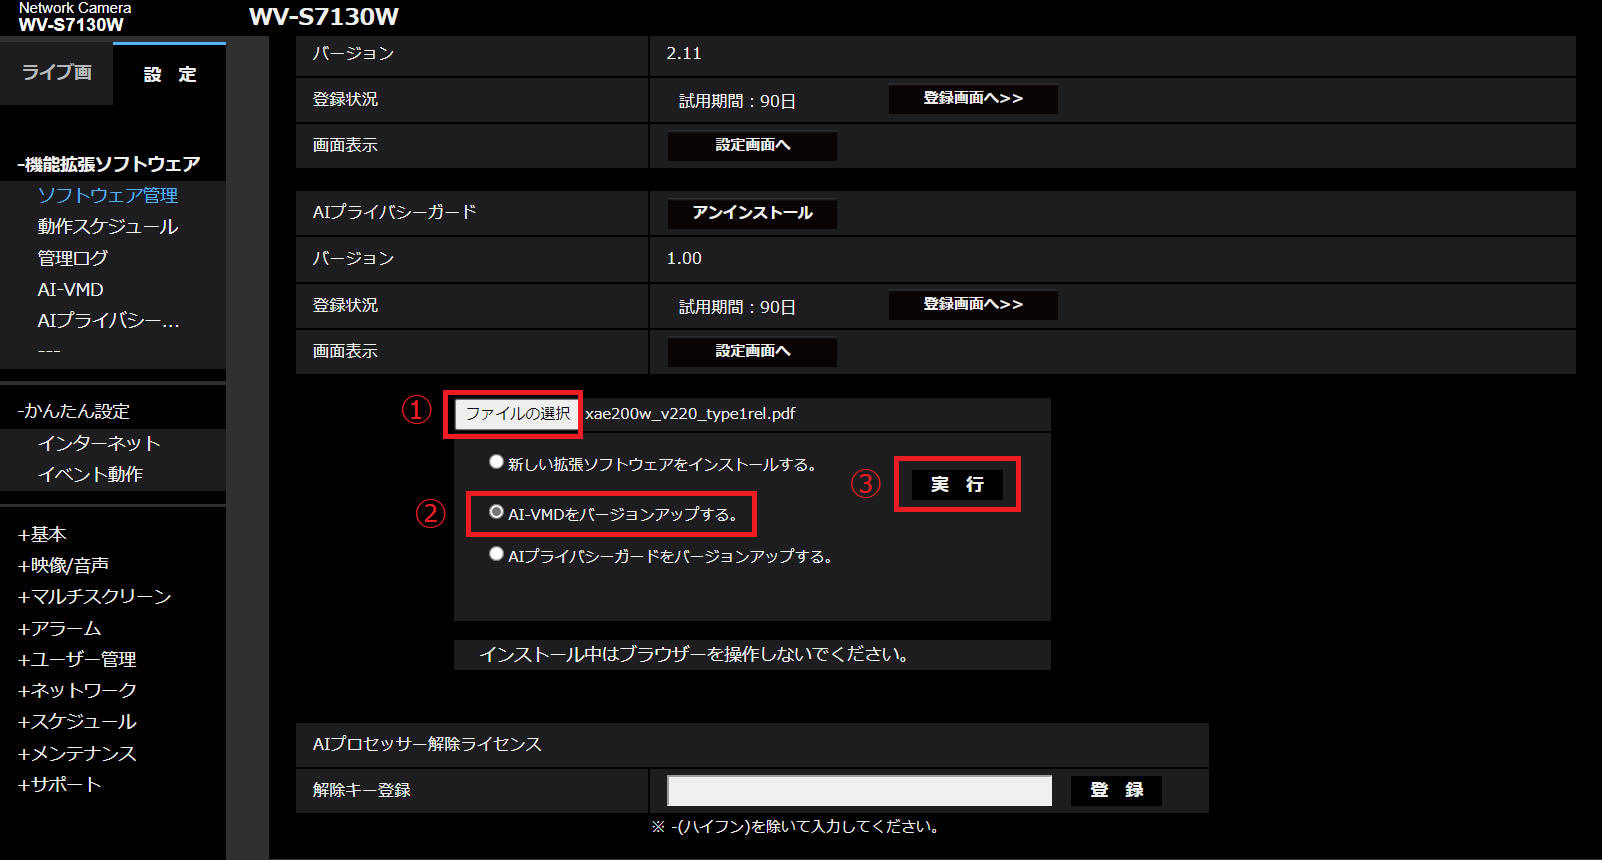
(1)
「JPEGで画像を取得する - 5.連番のJPEGファイルで保存する」
「MJPEGで画像を取得する - 5.連番のJPEGファイルで保存する」
に記載の方法を使って、WV-XAE200WUX を動作している状態の JPEG ファイルをPCに保存します。
(2)
資料[1][4]、JPEGファイル構造の資料[3]、
(1)で保存したファイルをバイナリエディタで表示した結果を見比べて確認などしていきます。
まずは仕様確認です。
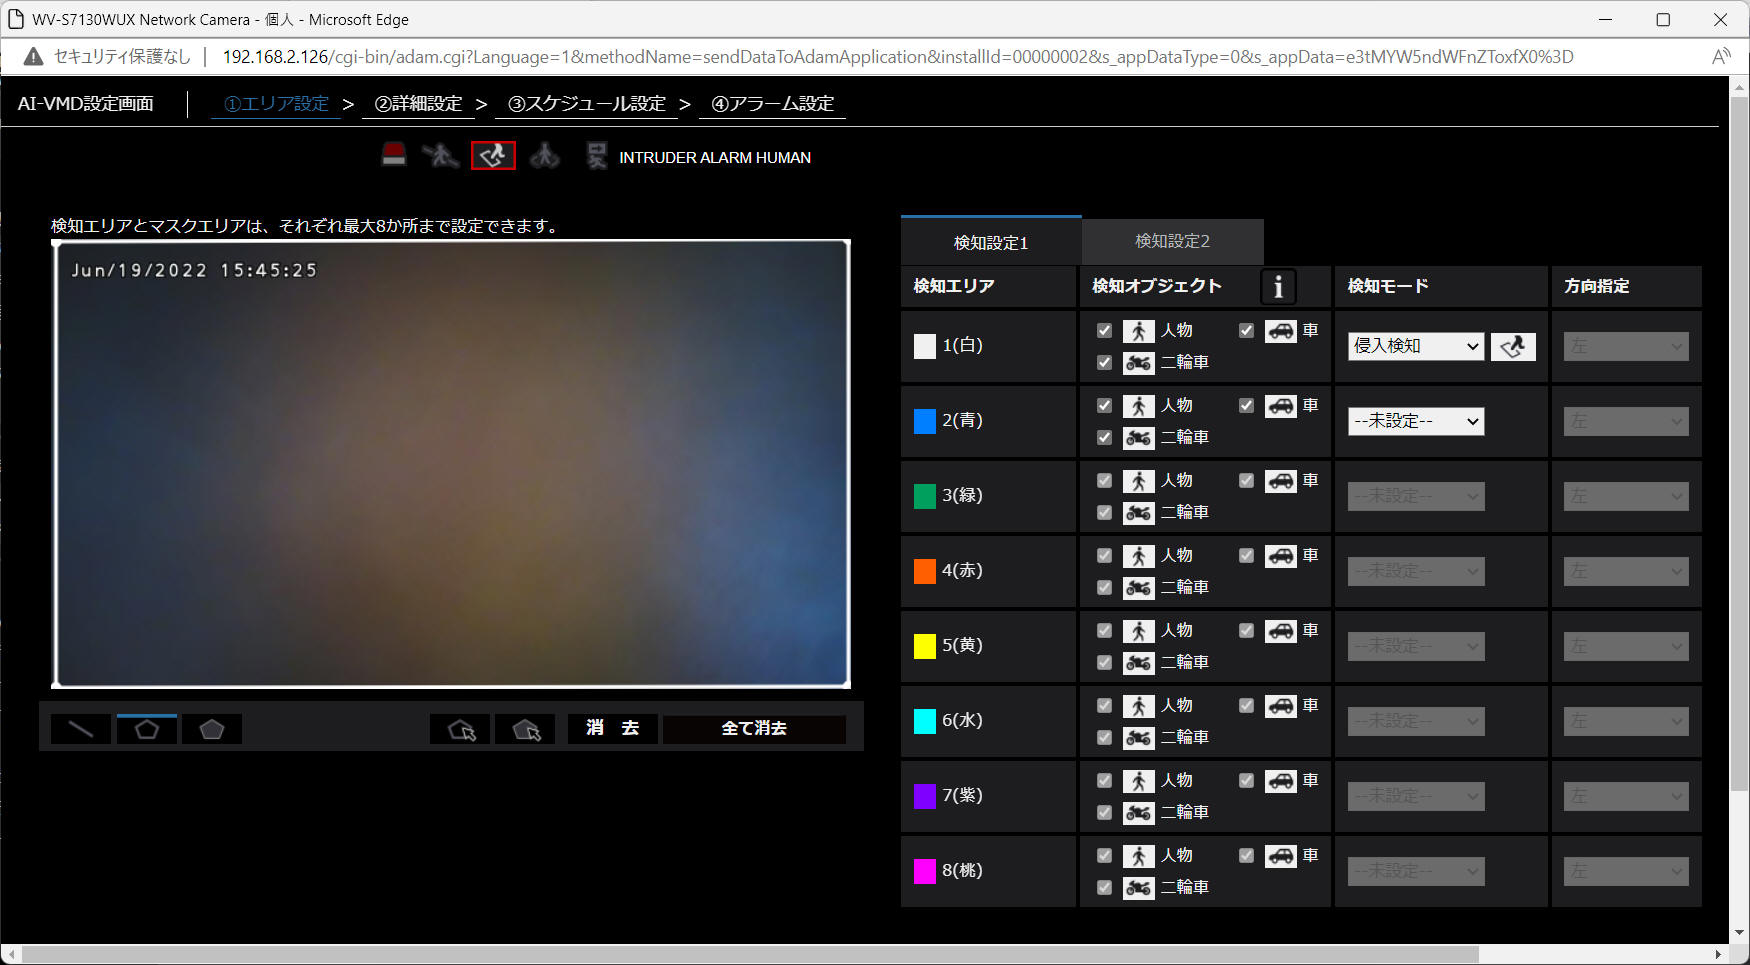
資料[1]の「i-proカメラ外部インタフェース仕様書ver1.59.pdf - 13.3.3.
JPEG」に下図のように記載されています。
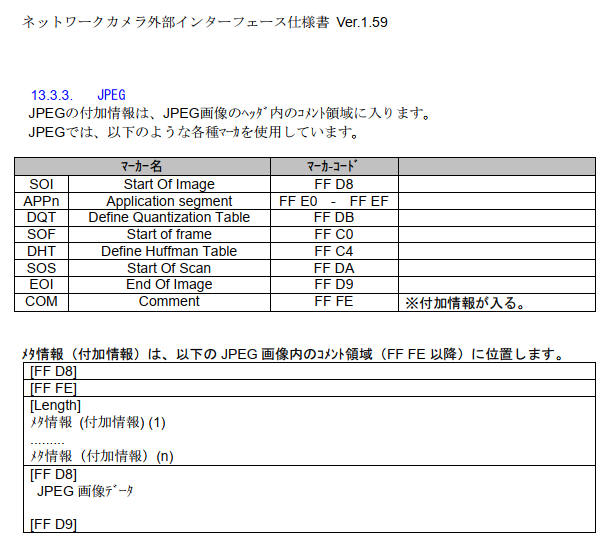
ポイント
- JPEGファイルは SOI(0xFFD8) で始まる。
- JPEGファイルは EOI(0xFFD9) で終わる。
- メタ情報(付加情報)はコメント領域に記録されている。(COM(0xFFFE))
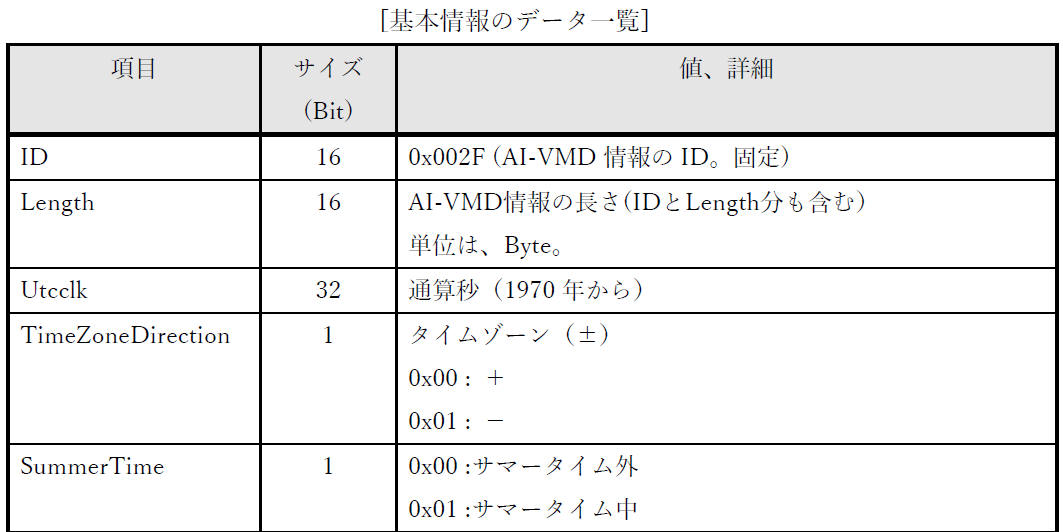
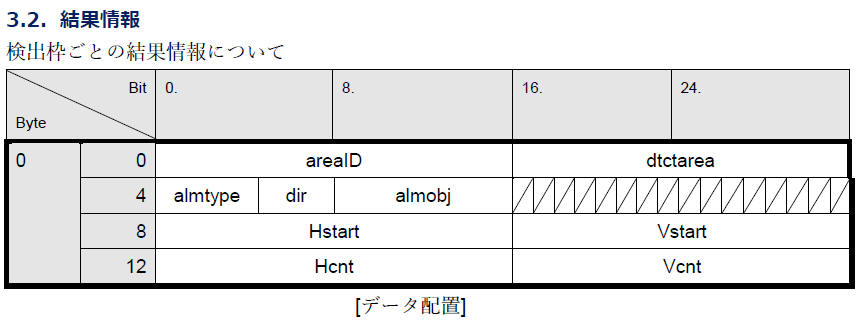
資料[4] の「3. 付加情報」「3.1. 基本情報」「3.2. 結果情報」で下図のように記載されています。


(3)
以上を踏まえて、実際に取得した JPEG ファイルを解析します。
下記内容は私が作成した image_000001.jpg
の例です。あなたが準備したデータとデータ構造は同じですが、具体的なデータは異なる内容となります。
[図: image_000001.jpg バイナリデータ解析結果]
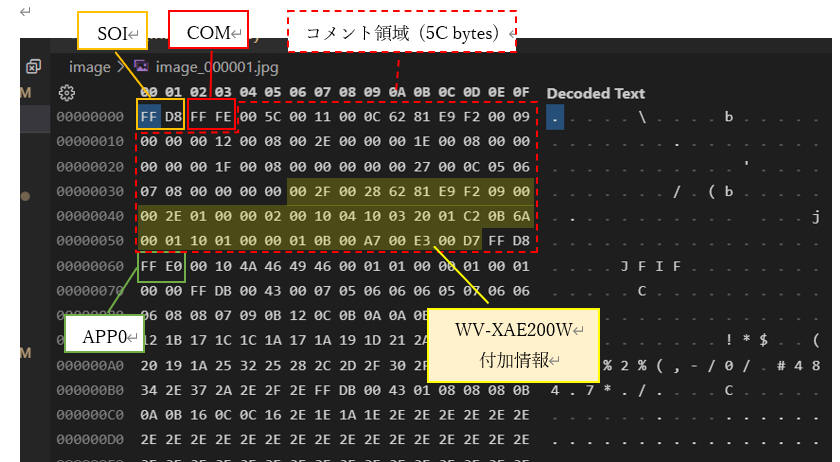
WV-XAE200WUX に関係する個所に絞って記載するとポイントは以下の通りです。
ポイント
- コメント領域中に "WV-XAE200WUX 付加情報" を記録している。
- "WV-XAE200WUX 付加情報" のタグコードは "0x002F"。
- コメント領域には他の付加情報も保存されている。
- "WV-XAE200WUX 付加情報" のデータ長は、検知数に応じて変わる可変長。
[表: WV-XAE200WUX 付加情報部分を解析した結果]
| データ |
項目 |
説明 |
| 00 2F |
ID (16 bit) |
付加情報(0x002F) |
| 00 28 |
Length (16 bit) |
|
| 62 81 E9 F2 |
UtcClock (32 bit) |
UTC clock 1970年からの通算秒
0x6281E9F2 = 1,652,681,202[秒]
= 19,128[日] + 6[時間] + 6[分] + 42[秒]
⇨ 2022年5月16日、タイムゾーン(+9)を考慮すると
15時6分42秒、正しそうです。 |
| 09 |
RFU (1 bit) |
|
| TimeZoneDirection (1 bit) |
0: プラス、1: マイナス |
| SummerTime (1 bit) |
0: サマータイム外、1: サマータイム中 |
| TimeZoneHour (5 bit) |
TimeZoneHour ; 9 |
| 以上から、0x09 はタイムゾーン "+9", "サマータイム外" という意味です。 |
| 00 |
TimeZoneMinute (8 bit) |
TimeZoneMinute = 0 |
| 00 2E |
FrameTime (16 bit) |
Utcclkを補足する10msec単位のカウンタ
0x00: 0msec
0x01: 10msec
~
0x63:990msec |
| 01 00 |
algorithmID (16 bit) |
"0x0100" 固定 |
| 00 02 |
RFU (6 bit)
|
000000(b) 固定 |
| resultinfoflag (1 bit) |
結果情報(枠情報)があるかないか
0: 無し
1: あり |
| uniqueinfoflag (1 bit) |
固有情報があるかないか
0: 無し
1: あり
WV-XAE200WUX では 0 固定。未使用と同意。 |
| 以上から、0x02 は "検知結果あり" を意味します。 |
| 00 10 |
resultInfoLength (16 bit) |
結果情報(Result information)の長さ。 Byte 単位。
AreaNum *
AreaLength [bytes] と同じ値となります。
|
| 04 10 |
AreaNum (6 bit)
|
AreaNum = 1 ; 検知数 1 の意味
|
| AreaLength (10 bit) |
AreaLength = 0x10 = 16 [bytes]
16[bytes] は下記 [表: Result
information of the detected area] が示すデータサイズです。
この例では次に記載の AreaNum が 1
なので、resultInfoLength は0x10(16)バイトとなります。 |
| 03 20 |
Imgwidth (16 bit) |
画像幅
0x0320 = 800 [px] |
| 01 C2 |
Imgheight (16 bit) |
画像高さ
0x01C2 = 450 [px] |
=== この範囲を検知した数だけ反復
[表: Result information of the detected area]
| データ |
項目 |
説明 |
| 0B 6A |
AreaID (16 bit)
|
検出枠のID (0 ~ 65,535)
0x0B6A = 2,922 |
| 00 01 |
dtctarea (16 bit)
|
エリアごとに1ビットを割り当て。
検知条件を満足するエリアのビットを '1' とする。
0x0001:検知条件1
検出エリア1
0x0002:検知条件1 検出エリア2
0x0004:検知条件1 検出エリア3
0x0008:検知条件1
検出エリア4
0x0010:検知条件1 検出エリア5
0x0020:検知条件1 検出エリア6
0x0040:検知条件1
検出エリア7
0x0080:検知条件1 検出エリア8
0x0100:検知条件2 検出エリア1
0x0200:検知条件2
検出エリア2
0x0400:検知条件2 検出エリア3
0x0800:検知条件2 検出エリア4
0x1000:検知条件2
検出エリア5
0x2000:検知条件2 検出エリア6
0x4000:検知条件2 検出エリア7
0x8000:検知条件2
検出エリア8
0x0001 ; 検知条件1 検出エリア1 で検知 |
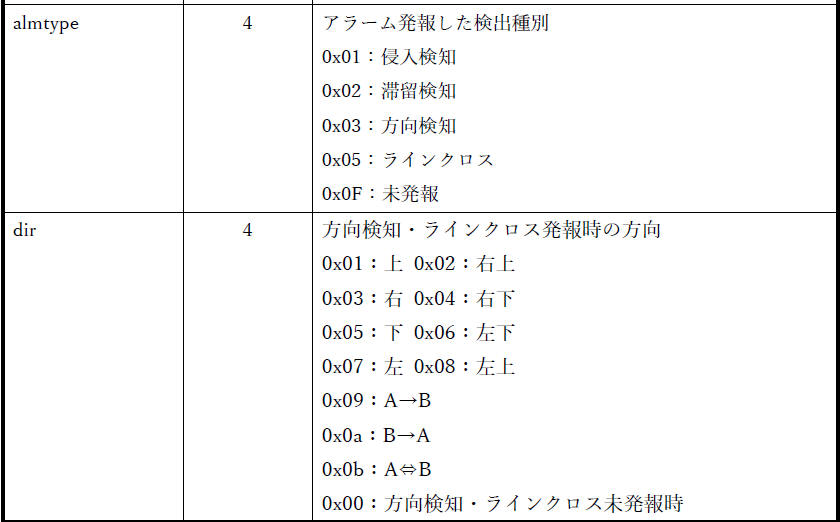
| 10 01 |
almtype (4 bit)
|
発報した際の検出種別
0x1:侵入検知
0x2:滞留検知
0x3:方向検知
0x4:置き去り・持ち去り検知
0x5:ラインクロス検知
0xF:未発報
almtype= 1 (侵入検知)
|
| dir (16 bit) |
方向検知・ラインクロス検知で発報時の方向
0x00:方向なし(方向検知・ラインクロス未発報時)
0x01:上
0x02:右上
0x03:右
0x04:右下
0x05:下
0x06:左下
0x07:左
0x08:左上
0x10:A→B
0x20:B→A
0x30:A⇔B
dir = 0 (方向なし) |
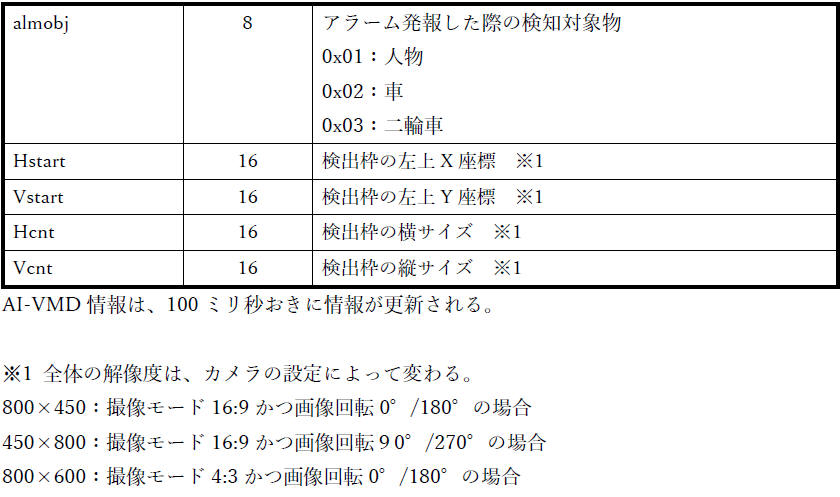
| almobj (4 bit) |
発報した検知対象物
0x0:種別なし(almtyp が 0x4 のとき)
0x1:人物
0x2:車
0x3:二輪車
0x4:未発報(今後の発報候補。almtype が 0xF のとき)
almobj = 1 (人物) |
| 00 00 |
RFU (16 bit) |
H'0000 固定 |
| 01 0B |
hstart (16 bit) |
0x010B = 267 |
| 00 A7 |
vstart (16 bit) |
0x00A7 = 167 |
| 00 E3 |
hcnt (16 bit) |
0x00E3 = 227 |
| 00 D7 |
vcnt (16 bit) |
0x00D7 = 215 |
=== ここまで
(注) RFU : Rest for Future Use (将来使用のための未使用領域)
(4)
ここまでの情報を踏まえて、JPEGファイルを解析して WV-XAE200WUX 付加情報を取得するプログラムを作成してみます。
(4-1) 最初に対象バイナリデータが JPEG ファイルであるかを確認する関数を作成します。
バイナリデータの先頭が SOI(0xffd8) で末尾が EOI(0xffd9) であればOKとしています。
def IsJpegFile(data):
    '''
    Check if data is JPEG data.
    data が JPEG データであることを確認する。

    Args:
        data            [i] Data to be confirmed.
    Returns:
        True            Data is JPEG.
        False           Data is not JPEG.
    Raises
        None
    '''
    result = False

    length = len(data)
    if length >= 4:
        SOI, = struct.unpack('>H', data[0:2])
        EOI, = struct.unpack('>H', data[length-2:length])
        if SOI == 0xffd8 and EOI == 0xffd9:
            result = True

    return result
(4-2) JPEGヘッダ情報を分析してタグを抽出する関数を作成します。
ANS.1 形式と似た TLV 構造になっているので、関数に渡されたデータ先頭から JPEG 仕様に従って Tag, Length, Value
を取り出します。
def ParseJpegHeadder(data):
    '''
    Get Tag, Length, Value (data_interior), the following data from JPEG header data.
    JPEG ヘッダデータから Tag, Length, Value(data_interior), 次のデータ を取得する。

    Args:
        data            [i] Data to be confirmed.
    Returns:
        result          True:   success
                        False:  failure
        tag             Tag
        length          Length
        data_interior   Value. If it does not exist, it will be None.
        data_next       The following data after data_interior. If it does not exist, it will be None.
    Raises
        None
    '''
    result = False
    tag = 0
    length = 0
    data_length = len(data)
    data_interior = None
    data_next = None

    if data_length >= 4:
        tag, length, = struct.unpack('>HH', data[0:4])
        if tag & 0xff00 == 0xff00:
            if length + 2 <= data_length:
                data_interior = data[4:length+2]
                data_next = data[length+2:data_length]
                result = True

    return result, tag, length, data_interior, data_next
(4-3) コメント領域のデータを渡すことで WV-XAE200WUX 付加情報を取得する関数を作成します。
WV-XAE200WUX データのタグは 0x002f なので、これを探します。
見つけたらこの後で記載する ParseAivmdResult 関数に渡して詳細分析を行います。
def ParseJpegComment(data):
    '''
    This function obtains the WV-XAE200WUX (aivmd) recognition result from the JPEG comment data.
    JPEG コメントデータから WV-XAE200WUX (aivmd) 認識結果を取得する。

    Args:
        data            [i] JPEG comment data.
    Returns:
        result          True:   success
                        False:  failure
        aivmd_result    The WV-XAE200WUX (aivmd) recognition result.
    Raises
        None
    '''
    result = False
    aivmd_result = None
    length = len(data)

    while True:
        if length >= 4:
            tag, data_length = struct.unpack('>HH', data[0:4])
            if data_length <= length:
                data_interior = data[4: data_length]
                data = data[data_length:]
                length -= data_length

                if tag == 0x002f:   # 0x002f means AI-VMD meta information.
                    aivmd_result = ParseAivmdResult(data_interior)
                    result = True
                    break
            else:
                break
        else:
            break

    return result, aivmd_result
(4-4) 取得した WV-XAE200WUX 付加情報を渡すと詳細を分析してくれる関数を作成します。
各データを切り出しして、辞書形式にして保存します。
def ParseAivmdResult(data):
    '''
    This function gets the recognition result in dictionary format from the WV-XAE200WUX (AI-VMD) recognition result.
    WV-XAE200WUX (AI-VMD) 認識結果から辞書形式の認識結果を取得する。

    Args:
        data            [i] WV-XAE200WUX (aivmd) recognition result.
    Returns:
        result          True:   success
                        False:  failure
        aivmd_result    the recognition result in dictionary format.
    Raises
        None
    '''
    result = {}
    result['detectResult'] = []
    length = len(data)

    UTCClock, timeZone, timeZoneMinute, frameTime   = struct.unpack('>LBBH', data[ 0: 8])
    algorithmId, resultInfo, resultInfoLength       = struct.unpack('>HHH',  data[ 8:14])
    areaInfo, imageWidth, imageHeight               = struct.unpack('>HHH',  data[14:20])
    areaNum = (areaInfo >> 10) & 0x3f
    areaLength = areaInfo & 0x3ff
    timeZoneDirection = (timeZone >> 6) & 0x01
    summerTime = (timeZone >> 5) & 0x01
    if timeZoneDirection == 0:
        timeZoneHour = + (timeZone & 0x1f)
    else:
        timeZoneHour = - (timeZone & 0x1f)
    resultInfoFlag = (resultInfo >> 1) & 0x01
    uniqueinfoflag = (resultInfo >> 0) & 0x01

    result['UTCClock']          = UTCClock
    result['timeZoneDirection'] = timeZoneDirection
    result['summerTime']        = summerTime
    result['timeZoneHour']      = timeZoneHour
    result['timeZoneMinute']    = timeZoneMinute
    result['frameTime']         = frameTime
    result['algorithmId']       = algorithmId           # 0x0100 fixed.
    result['resultInfoFlag']    = resultInfoFlag        # 0: detection,  1: no detection
    result['uniqueinfoflag']    = uniqueinfoflag
    result['resultInfoLength']  = resultInfoLength      # areaNum * areaLength [bytes]
    result['areaNum']           = areaNum
    result['areaLength']        = areaLength
    result['imageWidth']        = imageWidth
    result['imageHeight']       = imageHeight

    offset = length - resultInfoLength

    if (algorithmId==0x0100) and (resultInfoLength == areaNum * areaLength):
        for i in range(areaNum):
            areaId, detectArea, alarm   = struct.unpack('>HHH10x', data[offset+areaLength*i:offset+areaLength*(i+1)])
            hstart, vstart, hcnt, vcnt  = struct.unpack('>8xHHHH', data[offset+areaLength*i:offset+areaLength*(i+1)])
            almType = (alarm >> 12) & 0x0f
            direction = (alarm >> 8) & 0x0f
            almObj = (alarm & 0xff)

            detectResult = {}
            detectResult['areaId']      = areaId
            detectResult['detectArea']  = detectArea
            detectResult['almType']     = almType       # 1:Intruders, 2:Loitering, 3:Direction, 4:Object, 5:Cross line, 8:AI
            detectResult['Dir']         = direction     # 1:Up, 2:Up right, 3:Right, 4:Down right, 5:Down, 6:Down left, 7:Left, 8:Up left,
                                                        # 9:A→B, 10:B→A, 11:A⇔B
            detectResult['almObj']      = almObj        # 1: Person, 2: Car, 3: Bike, 4: Unknown
            detectResult['hstart']      = hstart
            detectResult['vstart']      = vstart
            detectResult['hcnt']        = hcnt
            detectResult['vcnt']        = vcnt

            result['detectResult'].append(detectResult)

    return result
(4-5) 以上の関数を使用して全体処理する部分を作成します。
概要説明省略、ソースコード中のコメントをご確認ください。
def ParseJpegFile(data):
    '''
    This function obtains the WV-XAE200WUX (aivmd) recognition results from the JPEG data.
    JPEG データから WV-XAE200WUX (aivmd) 認識結果を取得する。

    Args:
        data            [i] Data to be confirmed.
    Returns:
        result          True:   success
                        False:  failure
        aivmd_result    The WV-XAE200WUX (aivmd) recognition result.
    Raises
        None
    '''
    result = False
    aivmd_result = None

    if IsJpegFile(data) == True:
        next_data = data[2:]
        while True:
            result, tag, length, data, next_data = ParseJpegHeadder(next_data)

            if tag == 0xffda:   # SOS (Start Of Scan)
                break
            if result==False:
                break
            if tag == 0xfffe:   # COM (Comment)
                result, aivmd_result = ParseJpegComment(data)
                break

    return result, aivmd_result


if __name__ == "__main__":
    '''
    __main__ function.

    Raises
        FileNotFoundError
    '''
    filename = 'image_000001.jpg'

    with open(filename, 'rb') as fin:
        binaryData = fin.read()

    result, aivmd_result = ParseJpegFile(binaryData)
    if result==True:
        print(aivmd_result)
    else:
        print('Failure.')
(4-6) 最後に、プログラム全体を示します。
["parse_jpeg.py"]
'''
[Abstract]
    This program extracts the recognition result of WV-XAE200WUX (AI-VMD) from the JPEG file.
    WV-XAE200WUX (AI-VMD) の認識結果を JPEG ファイルから取り出します。

[Details]
    This program has been confirmed to work with WV-XAE200WUX Ver. 2.20.

[Library install]

'''

import struct


def ParseAivmdResult(data):
    '''
    This function gets the recognition result in dictionary format from the WV-XAE200WUX (AI-VMD) recognition result.
    WV-XAE200WUX (AI-VMD) 認識結果から辞書形式の認識結果を取得する。

    Args:
        data            [i] WV-XAE200WUX (aivmd) recognition result.
    Returns:
        result          True:   success
                        False:  failure
        aivmd_result    the recognition result in dictionary format.
    Raises
        None
    '''
    result = {}
    result['detectResult'] = []
    length = len(data)

    UTCClock, timeZone, timeZoneMinute, frameTime   = struct.unpack('>LBBH', data[ 0: 8])
    algorithmId, resultInfo, resultInfoLength       = struct.unpack('>HHH',  data[ 8:14])
    areaInfo, imageWidth, imageHeight               = struct.unpack('>HHH',  data[14:20])
    areaNum = (areaInfo >> 10) & 0x3f
    areaLength = areaInfo & 0x3ff
    timeZoneDirection = (timeZone >> 6) & 0x01
    summerTime = (timeZone >> 5) & 0x01
    if timeZoneDirection == 0:
        timeZoneHour = + (timeZone & 0x1f)
    else:
        timeZoneHour = - (timeZone & 0x1f)
    resultInfoFlag = (resultInfo >> 1) & 0x01
    uniqueinfoflag = (resultInfo >> 0) & 0x01

    result['UTCClock']          = UTCClock
    result['timeZoneDirection'] = timeZoneDirection
    result['summerTime']        = summerTime
    result['timeZoneHour']      = timeZoneHour
    result['timeZoneMinute']    = timeZoneMinute
    result['frameTime']         = frameTime
    result['algorithmId']       = algorithmId           # 0x0100 fixed.
    result['resultInfoFlag']    = resultInfoFlag        # 0: detection,  1: no detection
    result['uniqueinfoflag']    = uniqueinfoflag
    result['resultInfoLength']  = resultInfoLength      # areaNum * areaLength [bytes]
    result['areaNum']           = areaNum
    result['areaLength']        = areaLength
    result['imageWidth']        = imageWidth
    result['imageHeight']       = imageHeight

    offset = length - resultInfoLength

    if (algorithmId==0x0100) and (resultInfoLength == areaNum * areaLength):
        for i in range(areaNum):
            areaId, detectArea, alarm   = struct.unpack('>HHH10x', data[offset+areaLength*i:offset+areaLength*(i+1)])
            hstart, vstart, hcnt, vcnt  = struct.unpack('>8xHHHH', data[offset+areaLength*i:offset+areaLength*(i+1)])
            almType = (alarm >> 12) & 0x0f
            direction = (alarm >> 8) & 0x0f
            almObj = (alarm & 0xff)

            detectResult = {}
            detectResult['areaId']      = areaId
            detectResult['detectArea']  = detectArea
            detectResult['almType']     = almType       # 1:Intruders, 2:Loitering, 3:Direction, 4:Object, 5:Cross line, 8:AI
            detectResult['Dir']         = direction     # 1:Up, 2:Up right, 3:Right, 4:Down right, 5:Down, 6:Down left, 7:Left, 8:Up left,
                                                        # 9:A→B, 10:B→A, 11:A⇔B
            detectResult['almObj']      = almObj        # 1: Person, 2: Car, 3: Bike, 4: Unknown
            detectResult['hstart']      = hstart
            detectResult['vstart']      = vstart
            detectResult['hcnt']        = hcnt
            detectResult['vcnt']        = vcnt

            result['detectResult'].append(detectResult)

    return result


def ParseJpegComment(data):
    '''
    This function obtains the WV-XAE200WUX (aivmd) recognition result from the JPEG comment data.
    JPEG コメントデータから WV-XAE200WUX (aivmd) 認識結果を取得する。

    Args:
        data            [i] JPEG comment data.
    Returns:
        result          True:   success
                        False:  failure
        aivmd_result    The WV-XAE200WUX (aivmd) recognition result.
    Raises
        None
    '''
    result = False
    aivmd_result = None
    length = len(data)

    while True:
        if length >= 4:
            tag, data_length = struct.unpack('>HH', data[0:4])
            if data_length <= length:
                data_interior = data[4: data_length]
                data = data[data_length:]
                length -= data_length

                if tag == 0x002f:   # 0x002f means AI-VMD meta information.
                    aivmd_result = ParseAivmdResult(data_interior)
                    result = True
                    break
            else:
                break
        else:
            break

    return result, aivmd_result


def ParseJpegHeadder(data):
    '''
    Get Tag, Length, Value (data_interior), the following data from JPEG header data.
    JPEG ヘッダデータから Tag, Length, Value(data_interior), 次のデータ を取得する。

    Args:
        data            [i] Data to be confirmed.
    Returns:
        result          True:   success
                        False:  failure
        tag             Tag
        length          Length
        data_interior   Value. If it does not exist, it will be None.
        data_next       The following data after data_interior. If it does not exist, it will be None.
    Raises
        None
    '''
    result = False
    tag = 0
    length = 0
    data_length = len(data)
    data_interior = None
    data_next = None

    if data_length >= 4:
        tag, length, = struct.unpack('>HH', data[0:4])
        if tag & 0xff00 == 0xff00:
            if length + 2 <= data_length:
                data_interior = data[4:length+2]
                data_next = data[length+2:data_length]
                result = True

    return result, tag, length, data_interior, data_next


def IsJpegFile(data):
    '''
    Check if data is JPEG data.
    data が JPEG データであることを確認する。

    Args:
        data            [i] Data to be confirmed.
    Returns:
        True            Data is JPEG.
        False           Data is not JPEG.
    Raises
        None
    '''
    result = False

    length = len(data)
    if length >= 4:
        SOI, = struct.unpack('>H', data[0:2])
        EOI, = struct.unpack('>H', data[length-2:length])
        if SOI == 0xffd8 and EOI == 0xffd9:
            result = True

    return result


def ParseJpegFile(data):
    '''
    JPEG データから WV-XAE200WUX (aivmd) 認識結果を取得する。

    Args:
        data            [i] Data to be confirmed.
    Returns:
        result          True:   success
                        False:  failure
        aivmd_result    The WV-XAE200WUX (aivmd) recognition result.
    Raises
        None
    '''
    result = False
    aivmd_result = None

    if IsJpegFile(data) == True:
        next_data = data[2:]
        while True:
            result, tag, length, data, next_data = ParseJpegHeadder(next_data)

            if tag == 0xffda:   # SOS (Start Of Scan)
                break
            if result==False:
                break
            if tag == 0xfffe:   # COM (Comment)
                result, aivmd_result = ParseJpegComment(data)
                break

    return result, aivmd_result


if __name__ == "__main__":
    '''
    __main__ function.

    Raises
        FileNotFoundError
    '''
    filename = 'image_000001.jpg'

    with open(filename, 'rb') as fin:
        binaryData = fin.read()

    result, aivmd_result = ParseJpegFile(binaryData)
    if result==True:
        print(aivmd_result)
    else:
        print('Failure.')
実行結果の例です。
![[図] プログラム実行結果 例](connect_to_wv-xae200w/img8.jpg)
[図] プログラム実行結果 例
{'detectResult': [{'areaId': 2922,
'detectArea': 1, 'almType': 1, 'Dir': 0, 'almObj': 1, 'hstart': 267,
'vstart': 167, 'hcnt': 227, 'vcnt': 215}], 'UTCClock': 1652681202,
'timeZoneDirection': 0, 'summerTime': 0, 'timeZoneHour': 9,
'timeZoneMinute': 0, 'frameTime': 46, 'algorithmId': 256,
'resultInfoFlag': 1, 'uniqueinfoflag': 0, 'resultInfoLength': 16,
'areaNum': 1, 'areaLength': 16, 'imageWidth': 800, 'imageHeight': 450}
JPEG ファイルから WV-XAE200WUX の認識結果を取り出すことができました。
[概要]
前章で JPEG ファイルから認識結果を取り出ししました。
この章では、JPEGファイルから取り出した認識結果を使用して画像上の認識位置に枠を、分類結果として文字を、それぞれ描画して表示するサンプルプログラムを作成してみたいと思います。
[評価環境]
|
| 言語 : |
Python, |
3.10.4 |
|
| OS : |
Windows 11 home, |
21H2 |
| |
Windows 10 Pro, |
21H1 |
|
| 機能拡張ソフトウェア : |
WV-XAE200WUX, |
2.20 |
|
ポイント
- 下記プログラムの最初で from
parse_jpeg import ParseJpegFile を宣言することで、上記で作成した "parse_jpeg.py" を使用します。
- このため、以下のプログラムと同じ場所に "parse_jpeg.py" を保存する必要があります。
["draw_aivmd_rect.py"]
'''
[Abstract]
    This program extracts the recognition result of AI-VMD (WV-XAE200WUX) from the JPEG file,
    and the program draws the recognition result on the received video.
    AI-VMD (WV-XAE200WUX) の認識結果を JPEG ファイルから取り出し、受信した映像に認識結果を描画します。

[Details]
    This program has been confirmed to work with WV-XAE200WUX Ver. 2.20.

[Library install]
    cv2:    pip install opencv-python
    numpy:  pip install numpy

[Note]
    You need to save "parse_jpeg.py" in the same location as this program.
'''

import numpy as np
import cv2
from parse_jpeg import ParseJpegFile


def DrawAivmdRect(img, aivmd_result):
    '''
    This function draws recognition frames and texts on a given image according to the WV-XAE200WUX (AI-VMD) recognition result.
    WV-XAE200WUX (AI-VMD) 認識結果に従って、与えられた画像に認識枠とテキストを描画する。

    Args:
        img             [i] OpenCV image
        aivmd_result    [i] WV-XAE200WUX (aivmd) recognition result.
    Returns:
        img             Image with recognition frames and texts drawn.
    Raises
        None
    '''
    img_width  = img.shape[1]
    img_height = img.shape[0]
    aivmd_image_width = aivmd_result['imageWidth']
    aivmd_image_height = aivmd_result['imageHeight']

    # Draw rectangles and labels.
    if len(aivmd_result['detectResult']) != 0:
        for result in aivmd_result['detectResult']:
            pos_x = int(result['hstart'] * img_width  / aivmd_image_width)
            pos_y = int(result['vstart'] * img_height / aivmd_image_height)
            w     = int(result['hcnt']   * img_width  / aivmd_image_width)
            h     = int(result['vcnt']   * img_height / aivmd_image_height)
            obj   = int(result['almObj'])

            label = ''
            thickness = 3

            if obj == 1:
                # Person
                label = 'Person'
                color = (0,0,255)   # red
            if obj == 2:
                # Car
                label = 'Car'
                color = (255,0,0)   # blue
            if obj == 3:
                # Bike
                label = 'Bike'
                color = (0,255,0)   # green
            if obj == 4:
                # Future notification candidates
                label = ''
                color = (255,255,0) # sky blue
                thickness = 1

            # draw rectangles.
            cv2.rectangle(img, (pos_x, pos_y), (pos_x + w, pos_y + h), color, thickness=thickness)

            # draw text.
            label_pos_x = pos_x
            label_pos_y = pos_y - 10
            if label_pos_y <= 10:
                label_pos_y = pos_y + h + 30
            cv2.putText(img,
                text = label,
                org = (label_pos_x, label_pos_y),
                fontFace = cv2.FONT_HERSHEY_SIMPLEX,
                fontScale = 1.0,
                color = color,
                thickness = 2,
                lineType = cv2.LINE_AA)

    return img


if __name__ == "__main__":
    '''
    __main__ function.

    Raises
        FileNotFoundError :     Make sure that there is a file to set in FileName.
    '''
    filename = 'image_000001.jpg'       # Set the file name you use for the evaluation here.

    with open(filename, 'rb') as fin:
        binaryData = fin.read()

    # Convert from binary to ndarray.
    img_buf= np.frombuffer(binaryData, dtype=np.uint8)

    # Convert from ndarray to OpenCV image.
    img = cv2.imdecode(img_buf, cv2.IMREAD_UNCHANGED)

    # Extracts the recognition result of WV-XAE200WUX (AI-VMD) from the JPEG file.
    result, aivmd_result = ParseJpegFile(binaryData)

    if result==True:
        # Draws the recognition result on the received video.
        img = DrawAivmdRect(img, aivmd_result)

    # Please modify the value to fit your PC screen size.
    resizedImage = cv2.resize(img, (1280, 720))

    # Display video.
    windowTitle = "AI-VMD detection result."
    cv2.imshow(windowTitle, resizedImage)
    cv2.moveWindow(windowTitle, 100, 30)
    cv2.waitKey(0)      # necessary to display the video by imshow()
[プログラム動作例]
上記プログラムを実際に動作させた例を以下に記載します。
ここでは入力画像として、
https://pixabay.com から取得した動画(https://pixabay.com/ja/videos/原付-トラフィック-街-5638/)をテストに使用させていただきました。
商用利用無料、帰属表示必要なし、のコンテンツです。
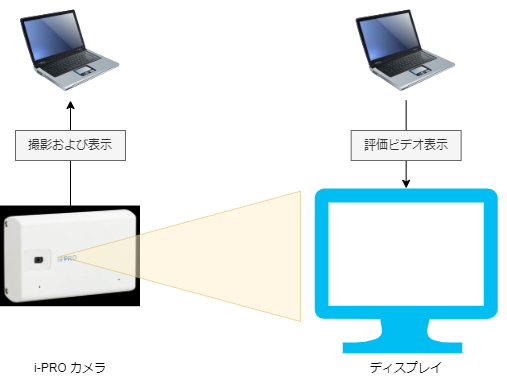
PC上で再生表示する動画を i-PRO カメラで接写しているため、画質が荒いこと、認識精度が微妙なこと、はご容赦ください。
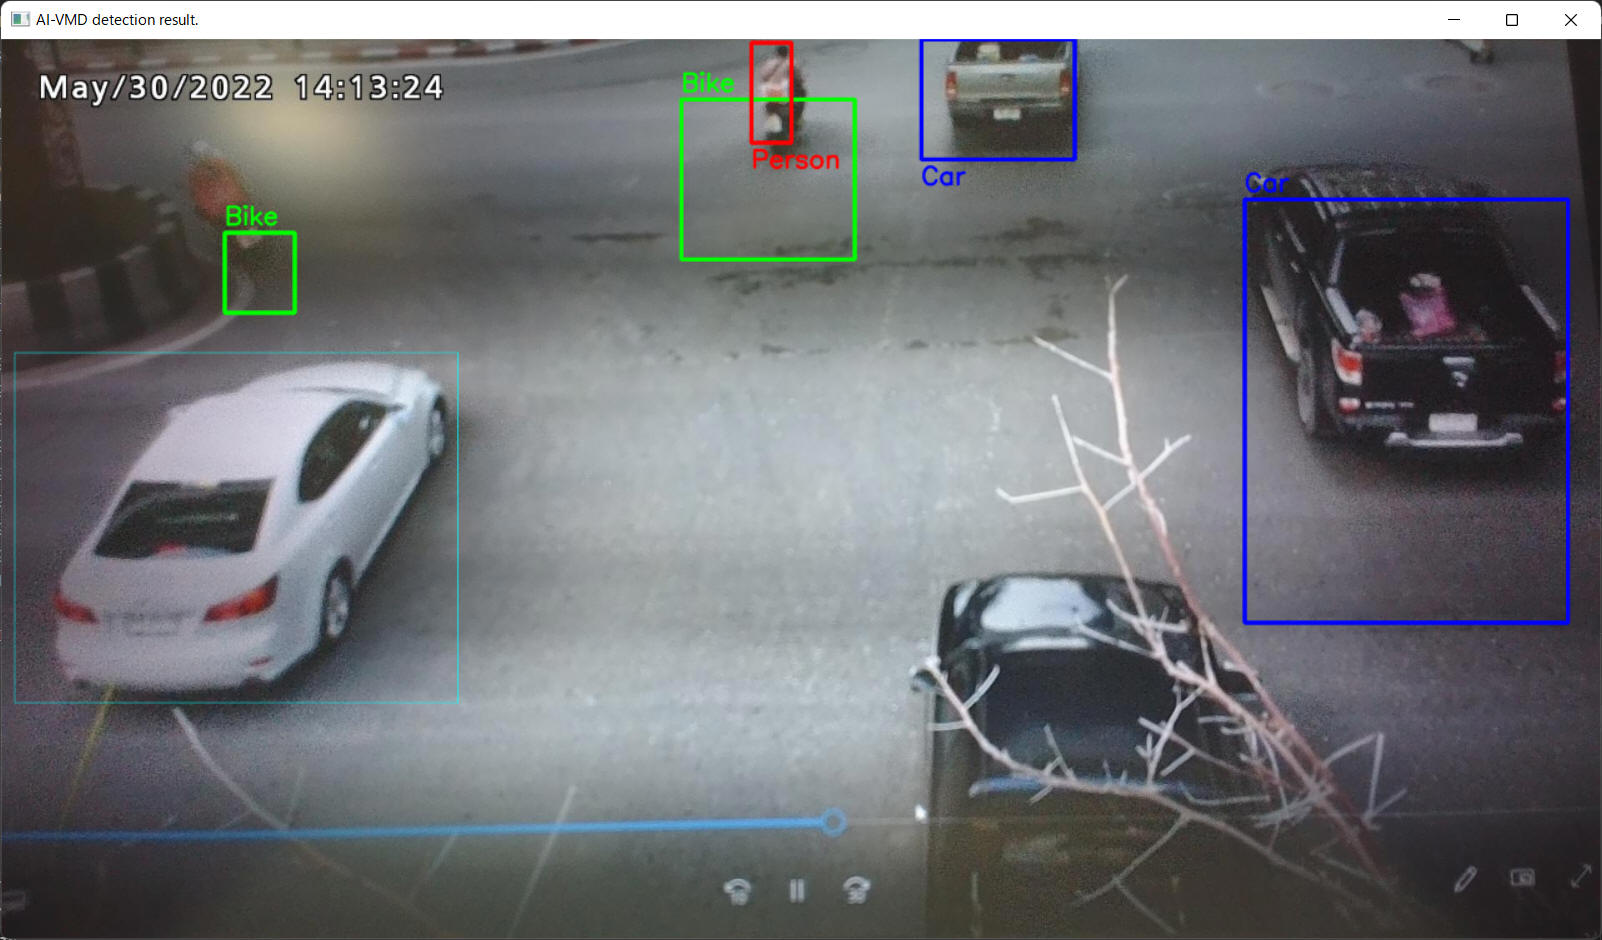
これぐらいの比較的簡単なプログラムで WV-XAE200WUX の結果を独自のPC表示することができました。
これで色や文字を独自に加工することもできますし、この結果を使って様々な応用を行うことも可能になるのではと考えます。